Okay, let’s just say it — there’s something magical about FAMOUS CREAM PUFFS. The kind that disappear from the dessert table before you even grab a second one. The kind your mom makes for holidays, and suddenly everyone’s hovering near the kitchen.
I still remember the first time I made these on my own. I was nervous. Cream puffs sounded fancy. Complicated. Bakery-level stuff. But honestly? Once I tried them, I realized they’re shockingly simple. And when that first batch puffed up in the oven? I felt like a total pastry rockstar.
If you’re a foodie who loves classic desserts with nostalgic vibes, you’re in the right place.
Why These Famous Cream Puffs Are So Loved
This isn’t just any cream puff recipe. It’s the kind passed down in families. The kind that earns a reputation at potlucks.
Here’s why they’re special:
- Light, airy choux pastry
- Buttery flavor with a hint of vanilla
- Creamy vanilla filling that’s rich but not heavy
- Simple pantry ingredients
- Impressive presentation with minimal effort
They look elegant. They taste indulgent. But the steps? Totally doable.
Ingredients You’ll Need
Let’s break it down.
For the Cream Puffs:
- 1 stick butter (½ cup)
- 1 cup water
- 1 teaspoon vanilla
- 1 cup flour
- 4 eggs
For Mom’s Celebrated Filling:
- ½ quart (2 cups) heavy cream
- 1 package (3.4 ounces) instant vanilla pudding
- ⅓ cup milk
That’s it. No complicated pastry cream. No stovetop custard. Just simple ingredients that come together beautifully.
How to Make Famous Cream Puffs (Step-by-Step)
Don’t let the fancy look fool you. Follow these steps and you’ll be golden.
Step 1: Preheat and Prep
Preheat your oven to 400°F. Line a baking sheet with parchment paper.
Trust me, parchment makes life easier.
Step 2: Make the Choux Pastry Dough
In a saucepan, combine butter and water. Bring it to a boil over medium heat.
Once boiling, remove from heat and stir in the flour all at once. Stir quickly until the mixture forms a ball and pulls away from the sides.
It will look thick. Almost like mashed potatoes. That’s normal.
Let it cool for about 5 minutes.
Step 3: Add the Eggs
Add eggs one at a time, mixing well after each addition.
At first, it might look separated and weird. Keep mixing. It will come together into a smooth, glossy dough.
Add vanilla and stir until combined.
The dough should be thick but pipeable.
Step 4: Pipe or Scoop
Drop spoonfuls of dough onto the baking sheet, leaving space between each one.
You can use a cookie scoop for even sizing. Or just eyeball it. I’ve done both — both work.
Step 5: Bake to Puffy Perfection
Bake for 20–25 minutes, or until golden brown and puffed up.
Important tip: Do NOT open the oven door while baking. Steam is what makes them rise.
When done, remove and let cool completely.
You’ll see hollow centers forming — that’s exactly what you want.
Make Mom’s Celebrated Filling
This filling is the real star.
In a mixing bowl, beat heavy cream, instant vanilla pudding mix, and milk until thick and fluffy.
It becomes rich, creamy, and slightly sweet with the perfect vanilla flavor.
Honestly, I’ve eaten this filling straight from the bowl. No regrets.
Assemble the Famous Cream Puffs
Once the shells are completely cool:
- Slice each puff in half
- Spoon or pipe the filling inside
- Replace the top
- Dust with powdered sugar
That powdered sugar finish? Classic. Elegant. Totally bakery-style.
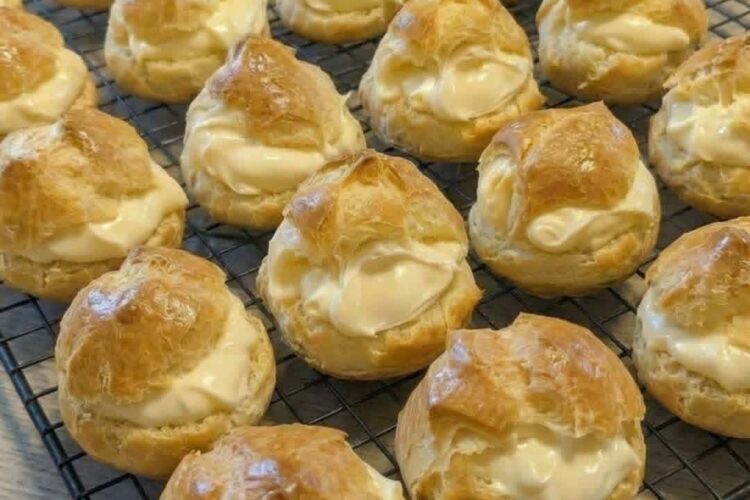
What Makes These Cream Puffs “Famous”?
It’s the texture contrast.
The outside is light and slightly crisp. The inside is airy and hollow. Then you get that creamy, dreamy filling.
Each bite is soft, rich, and slightly sweet without being overwhelming.
They feel fancy, but they taste like home.
And honestly? They’re the dessert people remember.
Pro Tips for Perfect Cream Puffs
Let’s keep it real — here’s what helps:
Use Room Temperature Eggs
They blend better into the dough.
Don’t Skip Cooling Time
If you fill warm shells, the cream melts.
Pipe for Cleaner Presentation
A piping bag gives that professional look.
Store Filled Puffs in the Fridge
They stay fresh and firm.
Fun Variations for Foodies
If you love experimenting, try these twists:
- Add chocolate drizzle on top
- Fill with chocolate pudding instead of vanilla
- Add fresh berries inside
- Mix a little almond extract into the dough
- Dip the tops in melted chocolate
One time I made a batch with strawberries inside for summer. They were gone in minutes.
Storage Tips
Here’s how to keep your famous cream puffs fresh:
- Store filled puffs in the refrigerator for up to 3 days
- Keep unfilled shells at room temperature for 1–2 days
- Freeze unfilled shells for up to 1 month
If they soften, pop empty shells in a 300°F oven for a few minutes to crisp back up.
Common Mistakes to Avoid
Even simple recipes have little traps.
Opening the oven too early – They may collapse.
Undermixing eggs – Dough won’t get smooth.
Overbaking – Can make shells too dry.
Filling too early – Cream melts inside warm puffs.
Follow the steps and you’ll be just fine.
FAQs About Famous Cream Puffs
1. Why did my cream puffs collapse?
Opening the oven door too soon or underbaking can cause collapse. Bake until fully golden.
2. Can I make cream puffs ahead of time?
Yes. Bake the shells ahead and fill them the day you serve.
3. Can I freeze cream puffs?
You can freeze unfilled shells. Filled ones are best fresh.
4. What is choux pastry?
Choux pastry is a cooked dough made with butter, water, flour, and eggs. It puffs up due to steam during baking.
5. Can I use whipped topping instead of heavy cream?
You can, but heavy cream gives a richer flavor and better texture.
6. How do I know when cream puffs are done?
They should be golden brown and feel light. The inside should be hollow.
Final Thoughts on Famous Cream Puffs
There’s something timeless about this dessert. It’s not trendy. It’s not flashy. It’s just classic.
These FAMOUS CREAM PUFFS bring together simple ingredients and turn them into something special. Light pastry. Creamy filling. Powdered sugar on top.
They’re perfect for holidays, birthdays, Sunday dinners, or honestly… just because.
And once you make them from scratch? You’ll realize they’re not intimidating at all. They’re fun. They’re satisfying. And yeah, they taste incredible.
So go grab that stick of butter and preheat your oven. Your kitchen is about to smell amazing.