Let’s be real for a second—nothing, and I mean nothing, smells better than Traditional Homemade Bread baking in your own kitchen. That warm, cozy scent hits, and suddenly the house feels calmer, happier, and kind of magical. Honestly, it takes me right back to slower mornings and meals that didn’t come from a package.
If you’ve ever thought homemade bread was too hard, too fussy, or just not worth the effort, hang tight. I used to think the same thing. Turns out, all you really need is a few basic ingredients, a little patience, and the confidence to get your hands a bit floury.
I’m walking you through this the way I’d explain it to a friend standing next to me at the counter—no stress, no fancy tools, just real-deal bread.
Why Traditional Homemade Bread Still Matters
Store-bought bread works in a pinch, sure. But Traditional Homemade Bread has heart. You control what goes in it. No long ingredient lists. No mystery additives. Just simple pantry staples coming together in a way that feels grounding.
Plus, making bread teaches you something valuable: slow food is good food. Bread doesn’t rush, and honestly, neither should we sometimes.
And let’s face it—pulling a golden loaf from the oven feels like a win. A big one.
Ingredients You’ll Need (That’s It!)
This recipe sticks to the basics. You might already have everything on hand.
- 1.5 cups warm water (not hot—think bathwater warm)
- 1 tablespoon active dry yeast
- 4 cups (500g) all-purpose flour
- 1 teaspoon salt
That’s the whole list. No sugar, no oil, no extras. Just the classic combo that’s been feeding families for generations.
Step 1: Wake Up the Yeast
Grab a large bowl and pour in the warm water. Sprinkle the yeast right on top. Give it a gentle stir and let it sit for about 5–10 minutes.
You’re looking for bubbles and a foamy surface. That’s how you know the yeast is alive and ready to work. If nothing happens, the yeast might be old. It happens to the best of us—just start again with fresh yeast.
(Pro tip: This is usually when I clean the counter and feel productive… for five whole minutes.)
Step 2: Add the Dry Ingredients
Once the yeast looks foamy, add the salt and start mixing in the flour, one cup at a time. Use a wooden spoon at first, then switch to your hands when it gets thick.
Don’t overthink this part. The dough should feel soft, a little sticky, but manageable. If it feels too wet, sprinkle in a bit more flour. If it feels dry, add a splash of water.
Bread dough is forgiving, which is honestly comforting.
Step 3: Kneading—The Hands-On Part
Turn the dough out onto a lightly floured surface and knead for about 8–10 minutes. Push it away with the heel of your hand, fold it back, turn it, repeat.
This part is therapy, I swear.
You’ll know it’s ready when the dough feels smooth and springs back when you poke it. That’s the gluten doing its thing.
Step 4: First Rise (Let Time Do the Work)
Place the dough in a lightly oiled bowl and cover it with a clean kitchen towel. Set it somewhere warm and let it rise for about 1 to 1.5 hours.
It should double in size. This is the perfect moment to relax, scroll your phone, or brag to someone that you’re making Traditional Homemade Bread from scratch.
Step 5: Shape the Loaf
Once risen, punch the dough down gently (very satisfying, by the way). Shape it into a loaf or a round boule—whatever feels right.
Place it on a baking sheet lined with parchment paper or in a loaf pan if that’s your style. Cover it again and let it rest for another 30–40 minutes.
Yes, bread likes naps.
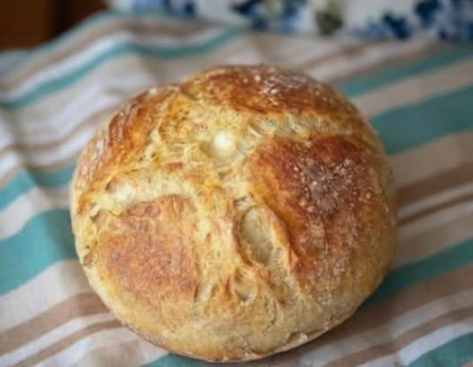
Step 6: Bake Until Golden and Gorgeous
Preheat your oven to 375°F.
Bake the bread for about 30–35 minutes, until the top is golden brown and the loaf sounds hollow when you tap the bottom. That sound is your green light.
Let it cool for at least 15 minutes before slicing. I know it’s hard. I’ve burned fingers more than once rushing this step.
What Makes Traditional Homemade Bread So Good?
It’s the texture. The crust has that gentle crunch, while the inside stays soft and chewy. It’s perfect for butter, jam, soup, or just tearing off hunks and eating like you mean it.
And the flavor? Clean, wheaty, comforting. No weird aftertaste. Just bread the way it’s meant to be.
Common Bread Mistakes (And How to Avoid Them)
Let’s keep it real—things can go sideways. Here’s how to stay on track:
- Water too hot can kill the yeast. Warm, not steaming.
- Too much flour makes dense bread. Add slowly.
- Skipping the rise time leads to flat loaves. Give it patience.
- Cutting too soon messes with the texture. Let it rest.
Even if it’s not perfect, it’ll still taste good. Homemade bread has grace.
How to Store Your Homemade Bread
Once fully cooled, store your Traditional Homemade Bread in a bread bag or wrapped in a clean towel at room temperature for up to 3 days.
You can also slice it and freeze it. Pop slices straight into the toaster when needed—weekday win right there.
Why This Recipe Builds Real Kitchen Confidence
This loaf teaches you the basics without overwhelming you. Once you master it, you’ll start thinking, Hey, maybe I can try whole wheat next, or What about herbs?
That’s how bread baking becomes a habit—not because it’s hard, but because it’s doable.
And honestly, there’s something powerful about feeding people with bread you made yourself. It’s simple. It’s real. It sticks with you.
Final Thoughts From My Kitchen to Yours
Traditional Homemade Bread isn’t about perfection. It’s about slowing down, trusting the process, and enjoying the reward at the end.
If this is your first loaf, welcome to the club. If it’s your hundredth, you already know why this matters.
Now go slice that bread, slather on some butter, and enjoy every bite. You earned it.