Honestly, there’s something special about homemade ice cream. The moment you scoop it into a bowl, it feels like a little celebration in the kitchen. When I first tried this recipe, my family hovered around the freezer like it was movie night snacks. And yeah… the bowl disappeared faster than I expected.
This rich homemade ice cream comes out thick, creamy, and packed with flavor. The mix of sweetened condensed milk, heavy cream, and powdered milk gives it that classic ice cream shop texture. Then comes the chocolate truffle ganache—oh wow, that part really makes it shine.
The best thing? You don’t need an ice cream machine. Just a bowl, a whisk, and a freezer. Families love it because it’s simple, and food lovers go crazy for the creamy texture.
Let’s get started.
Why This Homemade Ice Cream Is So Rich and Creamy
A lot of homemade ice cream recipes taste good, but this one feels extra creamy and smooth. The ingredients work together to give that deep, rich flavor.
Sweetened condensed milk adds sweetness and a thick texture. Heavy cream brings that classic creamy body. Powdered milk helps the mixture feel more like traditional churned ice cream.
Vanilla extract gives a warm flavor that balances the sweetness. And then, of course, there’s the chocolate truffle ganache swirling through every bite.
When these ingredients come together, the result is a rich homemade ice cream that tastes like it came from a dessert shop.
Ingredients for Rich Homemade Ice Cream
For the Ice Cream Base
- 2 cans sweetened condensed milk (about 800 g / 28 oz)
- 2 cartons heavy cream (400 g / 14 oz)
- 1 cup powdered milk (100 g / 3.5 oz)
- 1 tablespoon vanilla extract
For the Chocolate Truffle Ganache
- 200 g (7 oz) semi-sweet or milk chocolate
- ½ carton heavy cream (100 g / 3.5 oz)
These simple ingredients create a smooth and rich no-churn ice cream that families love.
Step-by-Step: How to Make Homemade Ice Cream
Step 1: Mix the Ice Cream Base
Start with a large mixing bowl. Pour in the sweetened condensed milk and heavy cream.
Whisk the mixture until it becomes smooth and slightly fluffy. This step helps the ice cream freeze with a lighter texture.
Next, add the powdered milk and whisk again. The mixture will start to look thicker and creamier.
Finally, add the vanilla extract and stir until everything blends together.
At this point, the base should look silky and rich—honestly, it already smells amazing.
Step 2: Make the Chocolate Truffle Ganache
Place the chocolate pieces in a heat-safe bowl.
Heat the heavy cream in a small saucepan until it becomes hot but not boiling.
Pour the hot cream over the chocolate and let it sit for about one minute. Then stir slowly until the chocolate melts completely.
The result should be a smooth, glossy ganache. Let it cool slightly so it thickens just a little.
This step adds deep chocolate flavor that makes the ice cream taste extra indulgent.
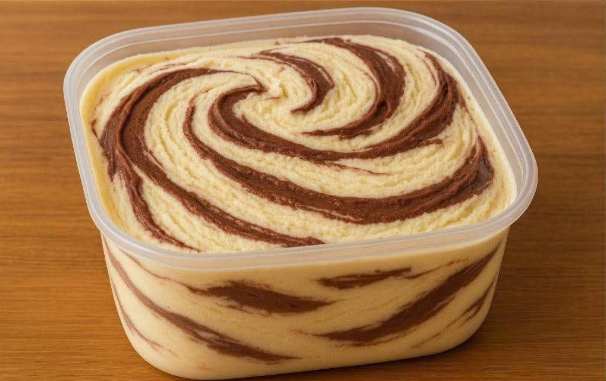
Step 3: Combine the Ice Cream and Ganache
Pour half of the ice cream base into a freezer-safe container.
Drizzle some of the chocolate ganache on top.
Add the remaining ice cream mixture and drizzle more ganache across the surface.
Use a spoon or knife to gently swirl the chocolate through the mixture. Don’t mix too much—those chocolate ribbons are the best part.
Step 4: Freeze the Ice Cream
Cover the container with a lid or plastic wrap.
Place it in the freezer for at least 6 hours, though overnight works even better.
As it freezes, the mixture thickens into a rich, creamy homemade ice cream that scoops beautifully.
Tips for Extra Creamy Homemade Ice Cream
Honestly, a few small tricks can make a big difference.
Use cold heavy cream. Cold cream whips better and helps the texture stay smooth.
Let the ganache cool slightly. If it’s too hot, it may melt the base mixture.
Freeze overnight if possible. This helps the flavors blend and the texture become firmer.
Store in an airtight container. This prevents ice crystals from forming.
And one more tip—if the ice cream feels too firm when you take it out, just leave it on the counter for about five minutes. Then it scoops like a dream.
Fun Variations Families Love
One of the best things about homemade ice cream is how easy it is to change the flavors.
Here are a few ideas that families in the U.S. really enjoy:
Chocolate chip: Stir in mini chocolate chips before freezing.
Cookies and cream: Crush chocolate sandwich cookies and mix them in.
Strawberry swirl: Add strawberry jam and swirl it through the mixture.
Peanut butter ripple: Warm peanut butter slightly and drizzle it into the ice cream before freezing.
Each variation keeps the same rich base but adds a fun twist.
Serving Ideas for Homemade Ice Cream
This rich ice cream tastes great on its own, but honestly, it gets even better with toppings.
Try serving it with:
- Warm brownies
- Chocolate syrup
- Fresh strawberries
- Crushed cookies
- Caramel sauce
Sometimes my family likes to build a little ice cream bar at home. Bowls of toppings on the table, everyone making their own dessert—it’s simple but super fun.
How to Store Homemade Ice Cream
Homemade ice cream stores well in the freezer for about 2 weeks.
Keep it in a sealed freezer container to protect the texture.
If the ice cream becomes too firm, just leave it at room temperature for a few minutes before scooping.
This keeps it smooth and creamy every time.
Frequently Asked Questions
Why is my homemade ice cream too hard?
Homemade ice cream can freeze harder because it doesn’t contain stabilizers like store-bought brands. Let the container sit at room temperature for 5 minutes before scooping.
Can I make this homemade ice cream without powdered milk?
Yes. The powdered milk helps create a thicker texture, but the recipe still works without it. The ice cream may be slightly softer.
Can I use dark chocolate for the ganache?
Absolutely. Dark chocolate adds a deeper flavor and balances the sweetness of the condensed milk.
How long does homemade ice cream last in the freezer?
It stays fresh for about two weeks when stored in an airtight container.
Do I need an ice cream machine?
No, and that’s the beauty of this recipe. This is a no-churn homemade ice cream, so the freezer does all the work.
Final Thoughts on This Rich Homemade Ice Cream
This recipe is one of those desserts that families keep coming back to. It’s creamy, sweet, and honestly pretty fun to make together.
The chocolate ganache swirls make every scoop feel a little fancy, even though the recipe is super simple.
So next time the weather gets warm—or you just want a cozy dessert night—grab a bowl, mix up this rich homemade ice cream, and enjoy every creamy bite.
And fair warning… you might want to make a double batch. It disappears fast. 🍨